9,754 views
 Free tool – PVE Active Directory Disable Users
Every admin knows by now that using Active Directory as the central authentication database allows for a lot of possibilities in terms of user account and security management. Keeping internal as well as external users in one and the same AD might be a good idea if you have a lot of external people (partners, support contracts, …) that need to connect to resources in your network, whether it is remote (via vpn) or on-site.
However, these people are external people, and you might need to control those user accounts (because of legislation regulations or just because that’s a good idea). One of the options is to disable those user accounts every day.
As the number of users and groups grows, this can become a challenging and annoying task… After a short while, every admin will realize that it is hard to persevere because it will quickly become chaotic.
That’s why I wrote a tool to do this. You can download the installer or update package from http://users.telenet.be/internet.activities/freetools/addisableuser
This is how it works (assuming that you’ve managed to install the tool) :
First of all, you need to create 2 text files in the same directory as where the tool is installed. You can choose the filename of these textfiles, but for clarity, I will call them "users2disable.txt" and "users2ignore.txt"
The first file (users2disable.txt) contains the references to the user accounts that need to be disabled. You can specify individual user accounts or groups, but you need to follow the following conventions :
For users, the object code is U. When specifying users, don’t use the "recursive" field, and don’t use a semi-colon at the end. You can use a DisplayName, a sAMAccountName, or a distinguished name (starting with LDAP://) to refer to a user account.
For groups, the object code is G. When specifying users, you can optionally specify ";true" (without the quotes) as a third field. This will also process any member groups (and their members) in the current group. You can use a DisplayName, a sAMAccountName or a distinguished name (starting with LDAP://) to refer to a group.
So an example users2disable.txt file would be :
U;peter.vaneeckhoutte
U;LDAP://cn=Partner1,ou=Partner Company A,dc=domain,dc=com
G;LDAP://cn=Partners B,ou=Partner Groups,dc=domain,dc=com;true
In this example, user "peter.vaneeckhoutte" will be disabled, user "Partner1" will be disabled, and all members in group "Partners B" will be disabled, including members of any nested child groups within the "Partners B" group.
As you can see, you can only specify one entry per line. Make sure to pick your user and group definitions in such a way that the tool can only find 1 object that matches with the entry. If not, the tool will use the first match, so this might result in unwanted behavior.
The users2ignore.txt file only accepts usernames. You don’t need to use an ignore file, but I would strongly advise you to do so, and to put your admin accounts in there. Otherwise, if you don’t set up your users2disable.txt file the right way, you might be able to disable all users, or disable you admin accounts. The users2ignore.txt file does not require a specific structure per line, you only need to put a reference to a user account (one per line) in the file. These references can be a DisplayName, sAMAccountName, distinguished name (starting with LDAP://) or a guid (which is nice if you have the good habit of renaming certain admin accounts – after all, the guid will always be the same)
An example users2ignore.txt file could look like this :
Administrator
server.administrator
ae99d5da-f2ff-41b9-a41c-d0bc470c49c9
After setting up these 2 files, you are ready to run the tool. Open a command prompt. If you launch the tool without parameters, you’ll get a quick syntax overview:
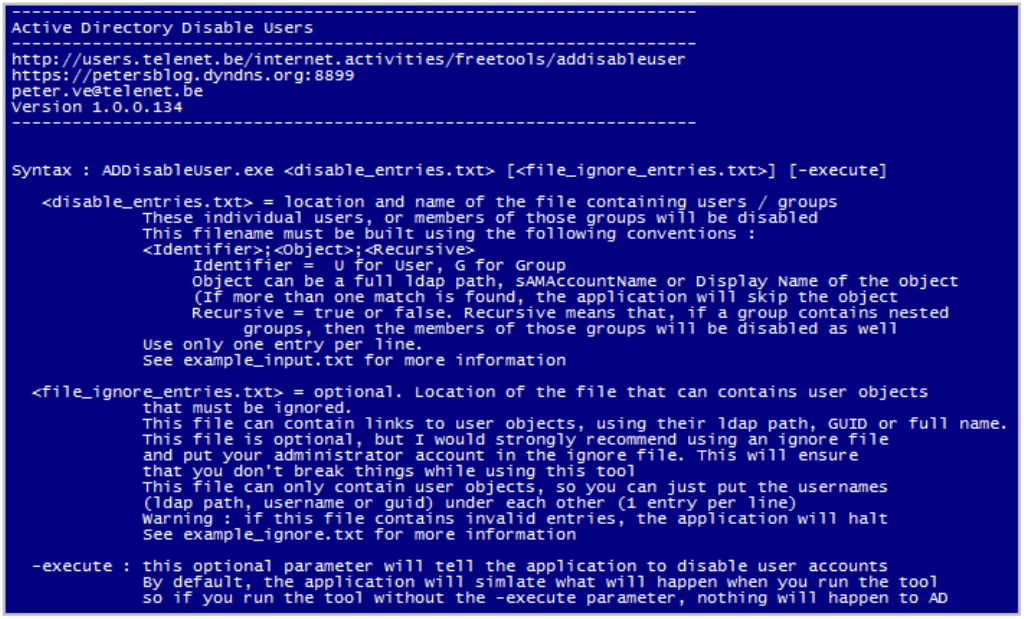
As you can see, only the input file "disable_entries.txt" is mandatory. The ignore file is optional, and so is the –execute parameter. Without specifying this parameter, nothing will happen to AD. The tool will run in simulation mode, so you can see what it will do when running with the –execute parameter turned on. This allows you to test, or to prevent disasters when you run the tool without paying attention. So keep in mind : by default, the tool will run in simulation mode. If you do not specify –execute, nothing will happen.
When you’ve played with the tool and when you are sure that the tool does what you need it to do, you can use the task scheduler to let the tool run as many times as you want. You could for example let the tool run at 6pm (if you are sure that you don’t want any external people to be able to connect to your network after 6pm)
The user account that is used to run the script (or to run the scheduled task) must have the rights to read AD (find user object, read group membership) and to disable a user account. (write permissions on the userAccountControl attribute)
The script automatically creates a log file, prefixed with the name of the month. The current version (starting from v1.0.0.136) will remove all log files older than 6 months automatically.
This version is still in beta – so if you have questions, comments, feature requests, bugs, etc – mail me directly peter [dot] ve [at] telenet [dot] be
© 2007 – 2021, Peter Van Eeckhoutte (corelanc0d3r). All rights reserved.
Similar/Related posts:

Donate

Your donation will help funding server hosting.