17,042 views
 Free tool – Attachment filtering with Exchange 2007/2010 (custom transport agent)
Keywords : microsoft exchange 2007 attachment size filtering quarantine block reject small zip files attached
When messaging admins need to implement some sort of attachment filtering, they mostly think about antivirus products, or using transport rules in Exchange 2007. I have discovered that not a lot of antivirus products nor the Exchange 2007 built-in functionalities really allow a lot of flexibility when it comes down to filtering attachments based e.g. on attachment size.
Suppose you want to block individual zip files based on their size (e.g. block or quarantine zip files that are smaller than 60kb), then you will have a hard time doing this. While this may sound basic functionality, the reality is that not a lot of AV products can do this, or the products that can, are quite expensive. Most of the tools can take drop/strip/quarantine actions based on email size, but not on the individual attachment size. So if your policy states that you are not allowing zip files smaller than 60Kb, somebody could easily bypass this rule by sending 61 zip files of 1Kb…
The tools that can perform this type of filtering may be too expensive for your budget.
Big problem. Especially when you realize that some of the commercial tools have this feature available in earlier versions of Exchange, and Lotus Domino as well. I had a call with the support center of one of these vendors 2 days ago, and they told me that they simply cannot implement this because of Exchange 2007… Can you imagine this ? Anyways, they’ll probably fix it in the future, but I need the attachment filter today. Period.
Anyways… to prove that they are wrong – no really, to fix my own problem (and perhaps your problem), for free, I decided to write my own Transport Agent for Exchange 2007.
I wrote this tool over the weekend, so I have not been able to fully stress-test it, but it works just fine in my environment.
Update – April 2009 – The attachment filter works fine on Exchange 2010 as well.
The tool consists of the following 4 major components :
A. 2 mandatory dll’s and 1 optional dll
Mandatory :
– PVEExchAttachFilterTptAgent.dll : this is the transport agent that will take care of the attachment filtering. Every email that is processed by this dll will be stamped by a custom header entry called “X-PVEExchAttachFilter”. Emails that already contain this header will not be processed by the Transport Agent. This ensures that we will be able to release emails from quarantine later on. Of course, this also introduces a security risk. After all, if someone decides to craft a custom email from the internet to your network, already containing this header, that email would not get processed. That is why I have written another transport agent called “PVEExchAttachFilterTptAgentCleanEdge” (see later). You can put that second Agent on your Edge servers. This agent will simply remove the X-PVEExchAttachFilter from all emails.
– chilkatDotNet2.dll : this is the helper dll that will allow me to send emails etc
These 2 dll’s should be placed on the HUB server.
Optional :
* PVEExchAttachFilterTptAgentCleanEdge.dll : this is the dll that will remove the custom X-header from all emails, and will stamp a new header called “X-PVEExchStrippedAttachFilterHeader” which is not used, but can be used by you in order to verify that the message has been processed by the agent.
This dll should NOT be placed on the HUB server. This dll is only useful if you are using dedicated Edge servers. If you are using a third party internet smtp relay, you should investigate whether you can implement Header entry removal on this relay.
This dll does not require any configurations or rules. It only removes the header and that’s it.
B. Attachment Filter Quarantine Management tool
PVEExchAttachFilterQuarantineManager.exe
This standalone tool must be placed on every HUB server that has the Transport Agent.
C. a set of folders and permissions on these folders(see later)
D. configuration files (see later)
Before you can start to use the tool, your have to set up your environment. The following steps and the sequence of these steps are very important, so follow the guidelines carefully !
1. Create the folder structure
Start with creating the following folder structure on your HUB server :
C:\PVEAttachFilterAgent
C:\PVEAttachFilterAgent\Log
C:\PVEAttachFilterAgent\Bin
C:\PVEAttachFilterAgent\Rules
C:\PVEAttachFilterAgent\Config
This drive and folder structure are currently hardcoded in the application. I may change this in the future, but until that happens, you must adhere to this convention.
In addition to these folders, you must create another folder that will host the quarantined messages. This folder can be put anywhere on the system and can have any name. Let’s assume that you will put the quarantine folder on drive D: and call it “PVEAttachFilterQuarantine”
D:\PVEAttachFilterQuarantine
2. Copy binaries and create configuration files
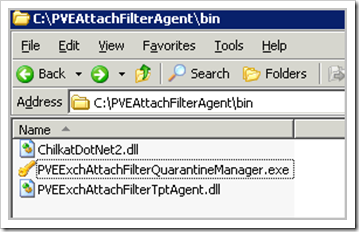
The rar file linked to this blog post contains the folder structure as indicated above. (You can download the file via the link at the bottom of this blog post). The \bin folder contains 3 dll’s and one exe file. You must put the following 3 files in the \Bin folder :
The PVEExchAttachFilterTptAgentCleanEdge.dll should not be placed on the HUB server. This file must be placed on the Edge server. It is recommended to create a similar directory structure on your Edge servers and put the PVEExchAttachFilterTptAgentCleanEdge.dll file in the \bin folder also.
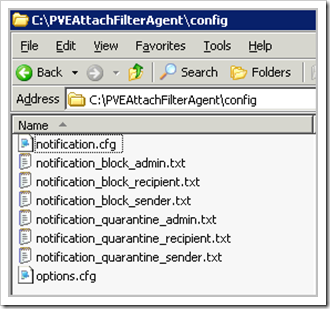
The rar file also contains a config folder. Extract the contents of this folder in the /config folder.
The folder should look like this :
The log and rules folders should be empty at this point. (They must exist though)
The D:\PVEAttachFilterQuarantine folder should be empty too at this point.
Note : these files are template files. If you are updating the tool to a newer version, do NOT extract/overwrite your own files with these files from the rar file. Otherwise, you will overwrite your own settings & templates with the default settings. All you need to do when updating is copying the new dll and exe files.
3. Set Permissions
Before configuring the options and rules, you will have to set some permissions on the folder structures.
The MS Exchange Transport service runs as “Network Service”. Because we will plug the TransportAgent into the MSExchangeTransport engine, “Network Service” needs to have full access to the folder structures.
Edit the security permissions for the C:\PVEAttachFilterAgent folder and add Network Service, granting Full Control on this folder, all subfolders and all objects in the folders & subfolders.
Do the same with the D:\PVEAttachFilterQuarantine folder
Before going on, verify that your folder structure is correct. Do not try to change your folderstructure, as this may break the application.
4. Configuration (only applies to the HUB server / tpt agent)
4.1. Global Options
In the C:\PVEAttachFilterAgent\Config folder, open the file options.cfg
This file has 2 options :
quarantinefolder=D:\PVEAttachFilterQuarantine
verboselogging=false
Change the quarantinefolder setting if you have created the Quarantine folder elsewhere.
Change verboselogging to true if you want to create log files. There will be one log file per week. Logfiles older than 6 months old should get deleted automatically.
4.2. Notification options
In the same folder, open the notification.cfg file
;
;
;
quarantine_notifyinternalsender=true
quarantine_notifyinternalrecipient=true
quarantine_notifyexternalsender=true
quarantine_notifyexternalrecipient=true
quarantine_notifyadmin=true
;
block_notifyinternalsender=true
block_notifyinternalrecipient=true
block_notifyexternalsender=true
block_notifyexternalrecipient=true
block_notifyadmin=true
;
;
;
quarantine_subject=[Warning] Attachment filter has quarantined a message
block_subject=[Warning] Attachment filter has permanently removed a message
stamp_subject=[Information] This email may contain dangerous attachment(s)
;
;
notifemail=do_not_reply@mydomain.com
admin=postmaster@mydomain.com
smtpserver=localhost
smtpport=25
;
;
internaldomains=mydomain.com,seconddomain.com
Change the email addresses and internaldomains according to your environment. It is important to specify the internal domains, as this is a requirement for the tool in order to be able to distinguish internal and external senders and recipients. So if you have not defined internaldomains, the notification of external/internal senders and recipients will not work.
As you can see in this config file, the attachment filter has 3 actions :
– stamp : which will just add some text to the subject of an email
– quarantine : which will put the entire email in the quarantine folder (eml format) and remove the message from the queue
– block : which will delete the mail from the queue.
You will need these 3 action keywords when we start defining rules
If you want to use the local HUB server to send the notification emails, make sure it accepts non-encrypted, anonymous connections for the local server. Otherwise, notification emails or quarantine releases won’t work.
4.3. Notification email templates
The config folder also contains some text files. The filename of these files are hardcoded in the application, so don’t change them.
These text files contain the body templates (html format) for the notification emails. You can use any html text in this file. The application will only stamp
at the top, and at the bottom, so don’t specify these tags yourself !Edit the files to change the text and email addresses. You may notice that the template contains some variables, which will be converted to live data when a notification email is sent.
Make sure to keep the variable names in lower case
| Variable name | Content |
| %from | Originating sender of the email |
| %to | Comma separated list of recipients |
| %subject | Subject of the email |
| %timestamp | Date/Time of the email |
| %attachments | List of all attachments |
| %violatingattachments | List of attachments that violated a filtering rule |
| %policy | Description of the filtering rule |
| %guid | Unique ID – this corresponds to quarantined emails and will help the admin to find back the quarantined message |
| %hostname | name of the server |
4.4. Rules
Now we are ready to create rules and actions. These rules are text files that should be stored in the \rules folder, and should have extension .rule
Example rule file : (make sure to put the description text on one line)
description=It is not allowed to send small (less than 60Kb) compressed

        files through the messaging system.         Small files shoud not be compressed. A lot of viruses use small

        compressed files as a distribution mechanism.

filename=
extension=zip,rar,tar,gz,ace,arj
minsize=0
maxsize=61440
action=quarantine
exceptionfrom=peter.ve@telenet.be,peter.ve@corelan.be
exceptionto=
description : this is a description of the rule. If you use the %policy variable in the notification templates, this is the text that will be displayed. Keep in mind – if you are using the %policy variable, this text will be part of the html body. So try to avoid using html tags in this text (such as <, > etc). If you still want to use those tags, make sure to URL encode them (> instead of > < instead of < etc). Just make sure to keep everyting on one line.
filename : this indicates the filename of part of the filename to trigger a rule. If you don’t care about the filename, leave this empty.
If you specify both a description and a filename, both parameters need to match in order to trigger the rule (AND operation). If you want to set up “OR” rule, you need to create multiple rules.
extension : this is the list of attachments to filter on. If one of the attachment extensions matches with one of these extensions, the rule will kick in
minsize and maxsize can be used to look at specific sizes. You can set the minsize or maxsize to -1 if you don’t want to use one of the two sizes.
Examples :
attachments < 60kb -> minsize=0 maxsize=61440
attachments between 10kb and 40kb -> minsize=10240 maxsize=40960
attachments larger than 500kb -> minsize =512000 maxsize=-1
action : this can be stamp, block or quarantine
exceptionfrom : apply the rule, except when it is coming from one of these email addresses
exceptionto : apply the rule, except when it is going to one of these email addresses
Note : keep the fields and keywords in lower case !
You can create multiple rules. If multiple rules apply to the same attachment, the strongest one will win. So if you have a rule that puts something in quarantine, and another rule that will block an email, and both rules apply to the same attachment, then the rule that blocks the email will win.
Note : do NOT ever change config/notification/… or any other files while the agent is running. Stop the MSExchangeTransport service, make your changes, and start the service again. This is very important !
5. Install the agent
5.1. Installing the HUB server agent
Open Exchange Management Shell (Powershell) and run the following command :
install-transportagent -Name "PVE Attachment Filter"

-TransportAgentFactory

   "PVEExchAttachFilterTptAgents.PVEExchAttachFilterTptAgentFactory"

-AssemblyPath

   "C:\PVEAttachFilterAgent\Bin\PVEExchAttachFilterTptAgent.dll"
Close the Exchange Management Shell and open the Shell again. This is important. If you don’t close the shell and open it again, the dll will stay locked and the installation procedure will fail
Run the following command to enable the agent :
enable-transportagent -Id "PVE Attachment Filter"
Restart MSExchange Transport service :
restart-service MSExchangeTransport
Close the Exchange Management Shell and open event viewer.
Make sure the service has started and does not throw any errors in the event log. If you see errors, make sure to verify the path structure, the permissions on all files and folders, and the contents of the configuration files.
You can verify that the agent is installed and enabled by running the “get-transportagent” cmdlet in EMS
5.2. Installing the “Header Cleaning” agent on the Edge server (optional)
Open Exchange Management Shell (Powershell) and run the following command :
install-transportagent -Name "PVE Attachment Filter Header Cleaning"

-TransportAgentFactory

        "PVEExchAttachFilterTptAgentCleanEdge.PVEExchAttachFilterTptAgentCleanEdgeFactory"

-AssemblyPath

       "C:\PVEAttachFilterAgent\Bin\PVEExchAttachFilterTptAgentCleanEdge.dll"
Close the Exchange Management Shell and open the Shell again. This is important. If you don’t close the shell and open it again, the dll will stay locked and the installation procedure will fail
Run the following command to enable the agent :
enable-transportagent -Id "PVE Attachment Filter Header Cleaning"
Restart MSExchange Transport service :
restart-service MSExchangeTransport
Close the Exchange Management Shell and open event viewer.
Make sure the service has started and does not throw any errors in the event log.
You can verify that the agent is installed and enabled by running the “get-transportagent” cmdlet in EMS
6. Test and manage
You can now start sending emails and see if your filter rules work.
Test case : I have created a rule that will block small zip files. The rule file looks like this :
description=It is not allowed to send small (less than 60Kb)

           compressed files through the messaging system.       Small files shoud not be compressed. A lot of viruses

           use small compressed files as a distribution mechanism.

filename=
extension=zip,rar,tar,gz,ace,arj,gzip,lzh,z_i_p,zip.renamed,rar.renamed,r_a_r
minsize=0
maxsize=61440
action=quarantine
exceptionfrom=
exceptionto=
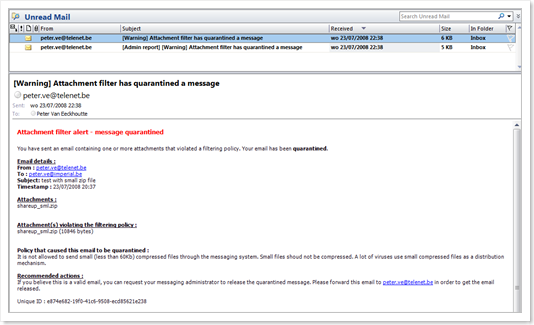
I have defined the notification config to notify the internal sender, and the administrator. My email account is also set as the admin email account, so I should get 2 emails when I sent out an email with an attachment that violates this rule.
(Don’t just copy & paste the contents of my rule file. You need to make sure the description is on 1 line only)
Only a few seconds after sending my email, I received 2 emails : One to the internal sender, and one to the administrator
If a user forwards a Attachment filter message, asking to release this message, this is what needs to be done :
First of all, because I have included the %guid variable in the notification template, I now can easily find back this email in the quarantine manager so I can release it. If you have not included this %guid variable in the email, you can still find back the email based on From:, To:, Subject: and Timestamp: fields
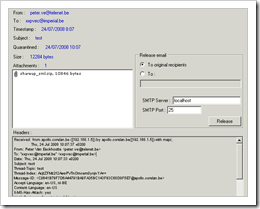
On the server, open the \bin folder, and launch the quarantine Manager. Either specify the guid in the Unique ID field, or just press the Load/Refresh button (assuming that the Quarantine path is set correctly) and you should see the quarantined email.
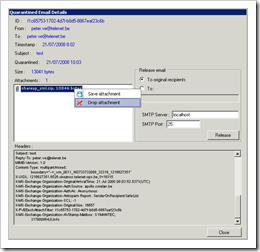
If you doubleclick the email (or right-click and choose ‘Quarantined email details’, you will be able to see the email headers and the list of attachments
You can release the email, or – if the list with attachments is displayed, you can drop attachments from the list or save attachments to disk. Keep in mind, if you drop attachments from a signed or encrypted email, the signature/encryption will be broken, and the email may become unusable…
When you release the email, the email will not being stopped again by the Transport Agent.
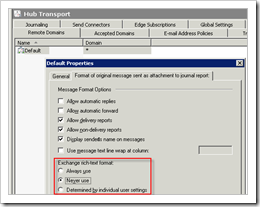
Note : winmail.dat attachments are supported starting from v1.0.0.24, however it is my recommendation to make sure users don’t sent Rich Text formatted emails. You can try to limit winmail.dat problems by changing the TNEF message format for messages sent to remote domain in Exchange : TNEF Conversion Options
The following cmdlets will help you determing whether you have set up your environment correctly
Get-RemoteDomain | FT DomainName, TNEFEnabled
Get-Mailcontact | FT Name, UseMAPIRichTextFormat

Get-MailUser | FT Name, UseMAPIRichTextFormat
Adiitionally, you can set Outlook Mail format options (globally and per email) to use HTML or plain text as the default as well.
7. Download the files
You can download the files here :
PVE Exchange Attachment Filter Transport Agent (2.3 MiB)
© 2008 – 2014, Peter Van Eeckhoutte (corelanc0d3r). All rights reserved.
Similar/Related posts:
 Exchange 2007/2010 : Renaming attachments ‘on the fly’ – custom transport agent
 Free tool – Free POP3 Collector
 Free Tool – Exchange 2007 Outbound SMTP gateway redundancy
 Exchange 2007 – Multi Account Domain to Single Resource Forest replication with IIFP and custom Rules Extension
 Exchange 2007 Administration : Antispam and Content Filtering
One Response to Free tool – Attachment filtering with Exchange 2007/2010 (custom transport agent)
Corelan Training
Check out our schedules page here and sign up for one of our classes now!
Donate

Your donation will help funding server hosting.
Corelan Team Merchandise
Corelan on Slack
You can chat with us and our friends on our Slack workspace:
